Author name: Tom Letellier

Behind the Scenes & Process

Why I Use BrickLink Studio to Design My LEGO Creations

When it comes to designing custom LEGO creations, choosing the right digital tool is essential. For me, that tool is BrickLink Studio—a powerful and free LEGO design software that lets builders plan, visualize, and refine their models before ever touching a physical brick. In this article, I’ll explain why BrickLink Studio is my go-to platform for building everything from LEGO giant robots to detailed architectural models. If you’re serious about LEGO digital design, keep reading to discover how BrickLink Studio can elevate your builds. 1. Intuitive and User-Friendly Interface Why It Matters: When you’re spending hours designing complex models, having a smooth and intuitive interface is a must. What I Love: Easy drag-and-drop functionality. Real-time snapping and alignment tools. A clean layout that doesn’t overwhelm. Whether you’re a beginner or an experienced builder, BrickLink Studio’s user interface makes the LEGO design process more enjoyable and efficient. 2. Massive LEGO Parts Library Why It Matters: You can’t build what you can’t find. BrickLink Studio includes an extensive LEGO parts database with almost every LEGO element available. What I Love: Accurate representations of real LEGO parts. Searchable categories and filters. Frequent updates to match the latest LEGO sets. This makes it easy to test ideas and stay creative without limitations. 3. Realistic Physics and Stability Tools Why It Matters: One of the main reasons I use BrickLink Studio is that it helps identify structural issues in LEGO builds before I start building in real life. What I Love: Collision detection prevents unrealistic overlaps. Built-in stability checker for analyzing weak connections. Ability to test different angles, poses, and positions. It doesn’t replace real-world testing, but it does help avoid major design flaws early on in the LEGO MOC (My Own Creation) process. 4. Integrated Instruction Maker Why It Matters: If you plan to share your designs or sell instructions, having a built-in LEGO instruction tool is a game changer. What I Love: Step-by-step instruction builder. Customizable layouts and views. Export to PDF for sharing or selling. This saves time and keeps everything in one place, especially useful for LEGO content creators. 5. Seamless Connection to BrickLink Marketplace Why It Matters: Once the design is finished, you’ll likely want to order parts. BrickLink Studio makes this step seamless. What I Love: Easy export of wanted lists. Direct upload to BrickLink.com. Automatic inventory comparison. This integration streamlines the transition from LEGO digital building to physical construction. 6. It’s 100% Free Why It Matters: Designing LEGO models digitally shouldn’t come with a price tag, especially for hobbyists. What I Love: No subscription fees. Free updates and support. High-quality features without the cost. Conclusion BrickLink Studio has completely transformed the way I design my LEGO creations. From its massive parts library and intuitive design tools to its built-in instruction maker and BrickLink integration, it’s the ultimate software for LEGO digital building. Whether you’re creating massive mechs, minifig-scale buildings, or functional display models, BrickLink Studio gives you the flexibility and power to bring your ideas to life with confidence. Want to Learn More About Digital LEGO Design? Check out my other articles for expert guides on: How to design stable LEGO models Bringing digital LEGO mechs to life Avoiding common LEGO design mistakes Start building smarter today with BrickLink Studio!


Behind the Scenes & Process

From Digital to Reality: How I Design LEGO Giant Robots

Designing LEGO giant robots (mechs) is one of the most exciting and complex types of custom LEGO builds I create. From concept to real-world display, each build goes through a carefully thought-out digital design process before it’s tested and assembled with real bricks. In this article, I’ll break down the step-by-step process I follow to turn a digital LEGO mech into a stable, detailed, and scale-accurate physical model. Step 1: Choosing the Right Scale (1:30 Custom Scale) The first and most important decision I make is choosing the scale of the LEGO robot. I work in a custom 1:30 scale, meaning the model represents the real object at 1/30th of its size. This scale allows for a satisfying balance between size, detail, and structural integrity. Why It Matters: It sets the proportions for every part of the robot. Helps me plan the level of detail I can include. Ensures consistency across all my custom LEGO models. Step 2: Setting Up Digital Reference Points Once I determine the size, I begin by placing reference guides in my digital design software (usually BrickLink Studio). These references help me visualize the overall dimensions of the mech. What I Do: Drop down height markers and base outlines. Add silhouette placeholders to represent major parts like the head, torso, arms, and legs. Why It Matters: Keeps the build within the intended scale. Helps anticipate weight distribution and poseability. Step 3: Rough Building and Sketching with LEGO Parts With references in place, I begin building the mech in broad shapes. At this stage, the goal isn’t perfection, but rather creating the overall volume and proportions. What I Do: Use basic bricks to block out large areas (torso, limbs, joints). Place key detail parts to help guide the final look. Try different design elements and adjust for symmetry. Why It Matters: Helps identify early structural weak points. Guides the aesthetic direction of the build. Step 4: Connecting and Refining the Structure This is where things get serious. I begin connecting all the parts into a unified, poseable structure. What I Do: Introduce Technic connections and internal supports. Reinforce major joints for stability. Add articulation and locking mechanisms where needed. Integrate SNOT (Studs Not on Top) techniques for clean visuals. Why It Matters: Ensures the mech is strong enough to stand and pose. Finalizes the core design before moving to real bricks. Step 5: Physical Testing and Adjustments Once the digital model is complete, I bring it into the real world using my own LEGO parts. What I Do: Build the mech from real bricks, one section at a time. Test for weak points using shake tests and gravity checks. Make changes if the real model reveals flaws in the digital plan. Why It Matters: Some parts that work digitally don’t work physically. Real-world stress testing improves durability. Step 6: Instructions and Final Touches With the build completed and tested, I create LEGO building instructions so others can build the mech too. What I Do: Break down the model into logical building stages. Design clear, easy-to-follow instruction pages. Add final polish: detailing, decals, and accessories. Conclusion Designing a custom LEGO giant robot is a complex yet rewarding process. From setting a reliable scale to digitally sketching the model and testing its physical strength, every stage is essential. By blending digital tools, physical testing, and LEGO building techniques, I bring each mech to life with both visual impact and functional stability. Want to Build LEGO Mechs Like These? Explore my other articles for expert tips on LEGO digital design, stability, and aesthetic techniques—or check out the full instructions to build one of my mechs yourself!  

Behind the Scenes & Process

The Evolution of My LEGO Building Skills: Lessons Learned Over Time

When I first started building with LEGO, I was focused on just getting pieces to fit together. Over time, my approach evolved into something much more refined: purposeful design, structural integrity, and visual storytelling. In this article, I’ll share how my LEGO building skills evolved and the key lessons I’ve learned throughout the journey. BeforeAfter Phase 1: The Beginner Stage – Just Building for Fun What I Did: Built small LEGO sets and followed instructions. Started creating simple LEGO MOCs (My Own Creations) using basic bricks. Focused on exterior appearance over function or strength. What I Learned: Creativity is sparked by experimentation. Official LEGO instructions are valuable for learning new techniques. Phase 2: Discovering the Power of Structure What I Did: Started building larger LEGO models and ran into structural issues. Bricks would fall off, or models would collapse under their own weight. What I Learned: Reinforcing the inside of a LEGO model is crucial. Technic pieces, overlapping plates, and proper connection points improve stability. Not everything that looks good in LEGO form will hold up in real life. Phase 3: Embracing Digital LEGO Design What I Did: Began using LEGO design software like BrickLink Studio. Planned builds before buying physical LEGO bricks. What I Learned: Digital LEGO tools help visualize and test ideas. It’s easy to overlook gravity and weak connections in software. Simulation is great, but physical testing of LEGO models is essential. Phase 4: Mastering Aesthetics and Playability What I Did: Focused on combining visual appeal with functional design. Built large LEGO display models and articulated LEGO mechs. What I Learned: SNOT techniques (Studs Not on Top) open up endless design possibilities. Movable joints in LEGO builds need to be both strong and flexible. Tiling and symmetry make a LEGO creation feel polished and complete. BeforeAfter Phase 5: Sharing and Learning from the LEGO Community What I Did: Started sharing my LEGO builds online and engaging with other builders. Asked for feedback and analyzed other creators’ techniques. What I Learned: There’s always something new to discover in the LEGO building community. Collaboration and critique make you a better builder. Documenting your process helps others and sharpens your own skills. Conclusion My LEGO journey has been filled with trial, error, creativity, and continuous improvement. From learning structural tricks to mastering aesthetics, every stage taught me something new. Whether you’re just starting or deep into custom LEGO building, there’s always room to grow. Want More LEGO Building Insights? Check out my other articles and follow for more LEGO building tips, techniques, and tutorials to take your MOCs to the next level!

Behind the Scenes & Process

Balancing Aesthetics and Stability in Large LEGO Models

Building large LEGO models is a thrilling challenge that requires a careful balance between aesthetics and stability. While a model may look visually impressive, it also needs to be structurally sound to prevent collapse or fragility. In this article, I’ll explore how to design large LEGO creations that are both visually stunning and highly durable. 1. Designing a Strong Core Structure Why It Matters: A well-built internal structure is essential for maintaining the integrity of large-scale LEGO models. How to Achieve It: Use Technic beams and bricks with cross-supports to form a sturdy core. Reinforce large sections with interlocking plates instead of relying on single bricks. Plan for weight distribution to prevent sagging or collapsing over time. 2. Using Aesthetic Techniques Without Sacrificing Strength Why It Matters: LEGO models should be visually appealing, but some decorative techniques can weaken the structure. How to Achieve It: Combine SNOT (Studs Not on Top) techniques with traditional stacking for both design flexibility and strength. Use tiles and slopes sparingly to maintain stability while enhancing the model’s look. Avoid large overhanging elements unless they have hidden supports underneath. 3. Weight and Gravity Considerations Why It Matters: As models grow larger, gravity becomes a greater challenge, requiring reinforcement in key areas. How to Achieve It: Distribute weight evenly by placing heavier elements closer to the base. Use Technic pins and axles to connect sections securely. Test for structural integrity by gently applying pressure to different areas. 4. Modular Building for Easy Assembly and Transport Why It Matters: Large LEGO models can be difficult to build, move, and display if designed as a single unit. How to Achieve It: Break the model into modular sections that can be built and transported separately. Use hidden Technic connectors to seamlessly attach different parts. Ensure that each section is structurally independent to prevent failure. 5. Testing and Reinforcing Weak Points Why It Matters: A model’s weak points may not be obvious until real-world testing. How to Achieve It: Perform shake tests to identify fragile areas. Reinforce joints and connection points with additional bricks. Adjust overhanging elements if they appear unstable. Conclusion Balancing aesthetics and stability in large LEGO models requires thoughtful planning, strong core structures, and real-world testing. By integrating both design and engineering principles, you can build impressive, long-lasting LEGO creations. Want More LEGO Building Tips? Stay alerted for new expert LEGO techniques, stability tips, and large-scale building insights. Stay ahead in the world of custom LEGO design!  

Behind the Scenes & Process

How I Test My LEGO Models for Strength and Stability

Creating custom LEGO models is an exciting and rewarding process, but ensuring they are strong and stable is just as important as their design. Without proper LEGO stability testing, a model may collapse under its own weight or fall apart with minimal handling. In this article, I’ll share my step-by-step LEGO durability test process to ensure my builds are structurally sound and long-lasting. Step 1: Evaluating Structural Integrity in Digital Design Why It Matters: Before building a model physically, I analyze its structure in LEGO design software like BrickLink Studio or Mecabricks to identify potential weak points. How I Do It: I check for floating sections that lack proper support. I avoid illegal building techniques that may stress bricks. I reinforce key connection points with LEGO Technic elements or overlapping plates. Step 2: Testing Stability with Weight and Gravity Checks Why It Matters: Real-world gravity affects LEGO models differently than in digital design, so weight distribution testing is crucial. How I Do It: I place the model on a flat surface and observe any leaning or instability. I apply gentle pressure to different sections to see if they hold up. I lift the model by its weakest-looking area to check for structural failure. Step 3: Shake and Drop Tests Why It Matters: A well-built LEGO structure should withstand minor shocks without falling apart. How I Do It: I gently shake the model to simulate real-world movement. If weak points are exposed, I reinforce them with additional interlocking bricks. Step 4: Load-Bearing and Weight Tests Why It Matters: Larger LEGO models need to support their own weight without sagging or collapsing. How I Do It: I apply gradual weight pressure on roofs, bridges, and extended sections. I test vertical structures by placing additional weight on top to simulate stress. I reinforce weak areas with Technic beams, internal supports, or overlapping plates. Step 5: Movement and Articulation Testing Why It Matters: For LEGO models with moving parts, testing articulation ensures smooth and stable movement. How I Do It: I move each joint to ensure friction-based connections hold up. I test rotating or sliding sections for smooth movement. If parts detach too easily, I adjust with firmer connections like ball joints or Technic pins. Conclusion By following these LEGO strength testing techniques, I ensure that my custom LEGO builds are strong, stable, and durable. Whether designing for display, playability, or large-scale projects, these tests help improve both structure and longevity. Want More LEGO Building Tips? Stay updated for expert LEGO techniques, custom designs, and stability testing tips!  

Behind the Scenes & Process

Real vs. Digital: The Challenges of Bringing LEGO Creations to Life

Designing LEGO models digitally has transformed the way builders create and plan their projects. With powerful software like BrickLink Studio, Mecabricks, and LEGO Digital Designer (LDD), enthusiasts can build without physical limitations. However, transitioning a digital LEGO model into a real-life build presents several challenges. This guide explores the biggest obstacles LEGO builders face and how to overcome them. 1. Structural Stability and Gravity The Problem: In digital LEGO design, bricks stay in place effortlessly—no gravity, friction, or weight distribution issues. However, once built physically, models can collapse due to weak connections or poor support. Solutions: Use reinforcement techniques such as LEGO Technic beams and internal supports. Test critical sections physically before building the full model. Position heavier bricks lower to improve balance and prevent tipping. 2. Illegal Building Techniques The Problem: Digital LEGO design allows connections that aren’t feasible in real life. These “illegal techniques” can cause bricks to crack, strain, or not fit properly when assembled physically. Solutions: Follow LEGO-approved building techniques to ensure stability. Test unique angles and tight fits with real bricks before finalizing the design. Incorporate Technic elements for strong, unconventional connections. 3. Part Availability and Color Limitations The Problem: LEGO software offers every piece in every color—even those that don’t exist in real production. This can make recreating a digital model physically impossible. Solutions: Cross-check parts using BrickLink or LEGO’s Pick a Brick service. Adapt your design to use widely available elements. Be flexible with colors to ensure affordability and accessibility. 4. Complexity and Buildability The Problem: Some digital LEGO designs are difficult to assemble in reality due to hard-to-reach connections or fragile sections that can’t support weight. Solutions: Divide your model into logical subassemblies for easier construction. Ensure hand accessibility when placing small or deep-set pieces. Study official LEGO sets for smart building techniques and inspiration. 5. Cost and Brick Sourcing The Problem: Building a complex or large-scale LEGO model can be expensive, especially if it requires rare or discontinued pieces. Solutions: Use BrickLink’s price guide to estimate costs before purchasing bricks. Substitute expensive or hard-to-find elements with similar alternatives. Buy in bulk when possible to reduce per-piece costs and save on shipping. Conclusion While digital LEGO design offers limitless creativity, bringing a virtual creation to life requires careful consideration of stability, part availability, and buildability. By anticipating these challenges, LEGO builders can successfully turn digital designs into impressive real-world models. Want More LEGO Building Tips? Want to see more expert LEGO building tips? Stay tuned for exclusive tutorials and updates on custom LEGO models!

Behind the Scenes & Process

Step-by-Step Guide: The Journey of a Custom LEGO Model

Creating a custom LEGO model is an exciting process that blends creativity, engineering, and problem-solving. Whether you’re designing a LEGO mech, a movie-inspired diorama, or a completely original creation, each stage—from concept to completion—requires careful planning. In this guide, we’ll walk you through the step-by-step process of designing and building a custom LEGO model, ensuring your final creation is both structurally sound and visually stunning. Step 1: Concept and Inspiration How to Develop Your LEGO Model Idea: Every great LEGO build starts with an idea. Whether drawing inspiration from movies, real-world objects, or original concepts, defining your vision is crucial before moving forward. Research reference images and gather inspiration from LEGO sets and pop culture. Sketch rough designs or use digital tools to establish proportions. Define your model’s purpose—will it be for display, playability, or a complex build challenge? Step 2: Digital LEGO Design and Planning Bringing Your LEGO Model to Life in Software: Using LEGO design software like BrickLink Studio, Mecabricks, or LEGO Digital Designer (LDD) helps refine your model before committing to physical bricks. Key Considerations for Digital LEGO Design: Ensure structural stability by reinforcing weak points. Check part availability and choose realistic colors. Design with assembly in mind to make the build process smoother. Step 3: Sourcing LEGO Bricks for Your Custom Model Finding the Right LEGO Pieces: Once the digital model is finalized, you need to source the necessary LEGO bricks. Best Ways to Source LEGO Parts: Use BrickLink or LEGO’s Pick a Brick service to buy specific pieces. Sort through personal collections or repurpose parts from existing LEGO sets. Consider color substitutions for rare or expensive elements. Step 4: Building and Prototyping Your LEGO Model Testing the Physical Build: Even well-planned digital LEGO models often require real-world adjustments. Prototyping Tips: Build in sections to identify and fix structural weaknesses early. Modify design elements to enhance both stability and aesthetics. Test articulation and moving features for durability and playability. Step 5: Creating Instructions & Showcasing Your LEGO Model Sharing Your Custom LEGO Build with the World: Once your model is complete, you can create step-by-step building instructions and share it with the LEGO community. How to Share Your LEGO Model: Generate instructions using BrickLink Studio’s instruction maker. Take high-quality photos and share your build on LEGO forums and social media. Sell instructions or custom kits for other LEGO enthusiasts to build. Conclusion Designing and building a custom LEGO model is a rewarding journey that combines creativity with engineering. By following these step-by-step LEGO design tips, you can turn your LEGO ideas into reality and share them with the world. Stay Inspired! Want more LEGO building tips, custom model ideas, and expert advice? Stay updated for exclusive content and inspiration!

Behind the Scenes & Process

Mistakes to Avoid When Designing LEGO Models in Software

Designing LEGO models using software like BrickLink Studio, LEGO Digital Designer (LDD), and Mecabricks is an excellent way to plan intricate builds before purchasing bricks. However, many builders make common mistakes that lead to frustration when transitioning from digital design to real-world LEGO creations. In this guide, we’ll cover the top LEGO design mistakes and how to avoid them for a smoother building experience. 1. Ignoring Structural Stability The Problem: In LEGO software, there’s no gravity or friction, meaning models may look stable but collapse when built physically due to weak connections or poor weight distribution. How to Avoid It: Use LEGO Technic elements to reinforce joints and load-bearing areas. Build prototypes of critical sections to test structural integrity. Balance weight properly, ensuring heavier bricks are positioned lower. 2. Using Illegal Building Techniques The Problem: Some software tools allow connections that are impossible or too fragile in reality, including: Overly tight connections that put stress on bricks. Clipping or intersecting pieces that won’t fit properly. Unsupported angled connections that aren’t physically possible. How to Avoid It: Follow official LEGO design standards for secure connections. Physically test complex joints to ensure they work in reality. Use BrickLink Studio’s stability check to identify weak spots. 3. Overcomplicating the Design The Problem: It’s easy to over-design in software, leading to fragile structures and difficult builds. How to Avoid It: Prioritize durability over extreme detailing to keep models practical. Use subassemblies to break the model into manageable parts. Test complexity by building a physical version before finalizing. 4. Ignoring LEGO Part Availability and Colors The Problem: LEGO software includes every brick in every color—even those not available in real life. How to Avoid It: Use BrickLink’s database to verify real-world part availability. Stick to widely available colors to ensure easy sourcing. Be flexible with color choices if certain pieces are rare or expensive. 5. Weak or Unsupported Joints The Problem: Some LEGO models depend on clips, ball joints, or hinges that may not support real-world movement or weight. How to Avoid It: Reinforce moving parts by doubling up connection points. Choose friction-based joints for better support. Test articulation points early to prevent floppy or weak sections. 6. Designing Without Proper Scaling The Problem: Without a reference point, models might be too large or too small when built. How to Avoid It: Compare the model to a LEGO minifigure or standard brick for accurate scaling. Use measurement tools within the software to maintain proportion. Consider display and storage space when determining final size. 7. Not Planning for LEGO Instruction Creation The Problem: A digital LEGO model may be easy to assemble virtually but nearly impossible to build step-by-step in real life due to overlapping parts or unclear sequences. How to Avoid It: Plan logical subassemblies to make instructions easier to follow. Use software features to generate step-by-step build instructions. Manually test the build process to identify any problematic steps. Conclusion By avoiding these common LEGO design mistakes, you can create models that are structurally sound, realistic to build, and easy to assemble. Whether you’re designing a massive LEGO mech, a custom spaceship, or a detailed diorama, following these best practices will ensure your digital creations transition seamlessly to real-world builds. Get More LEGO Design Tips! Stay ahead of the game— stay updated for expert LEGO building techniques, design inspiration, and exclusive updates on our latest custom LEGO models!

Behind the Scenes & Process

Why Some LEGO Designs Look Great in Software but Fail in Real Life

LEGO design software, like BrickLink Studio, LEGO Digital Designer (LDD), and Mecabricks, has revolutionized custom LEGO building. These tools enable intricate designs, quick modifications, and limitless brick selection. However, not all digital LEGO models translate well into real-world builds. This article explores common reasons why LEGO designs fail in real life and provides expert solutions to ensure your builds are both visually stunning and structurally sound. 1. Structural Weakness & Gravity Issues The Problem: In digital design software, there’s no gravity, friction, or weight distribution. A model may look perfect on-screen but collapse, sag, or detach when built with actual LEGO bricks. How to Fix It: Use LEGO Technic pieces for reinforcement, especially in large or articulated models. Test weight-bearing structures by building prototypes of critical sections. Avoid floating or unsupported connections that may not hold up under real-world conditions. 2. Illegal Building Techniques The Problem: LEGO software allows connections that aren’t possible or are too fragile in real life. Common “illegal techniques” include: Overly tight connections that put too much stress on bricks. Placing elements at impossible angles that rely on digital flexibility. Parts intersecting slightly, which works digitally but not physically. How to Fix It: Follow official LEGO building guidelines to avoid fragile connections. Check for stress points where bricks might warp or break over time. Physically test tricky connections before finalizing a design. 3. Availability of LEGO Parts in Desired Colors The Problem: In software, every part exists in every color. In reality, LEGO only produces certain elements in specific colors, making some designs impossible to recreate exactly as planned. How to Fix It: Use BrickLink’s color database to confirm part availability. Be flexible with color choices when translating a digital model to reality. Plan ahead to source rare LEGO pieces early if essential to your design. 4. Fragile Joints & Connections The Problem: Some designs rely on hinges, ball joints, or clips that work well in software but struggle to support weight in real life. This is a common issue for LEGO mechs, robots, and articulated models. How to Fix It: Double up on connection points to distribute stress. Use friction-based joints (e.g., ratcheted hinges) for heavier sections. Test articulation points early to ensure they can support movement. 5. Balance & Stability Issues The Problem: A LEGO model might stand perfectly in software but tip over in real life due to poor weight distribution. This happens often with top-heavy builds like LEGO mechs and towers. How to Fix It: Use a lower center of gravity by placing heavier bricks at the bottom. Widen the stance of models for better support. Use internal bracing to reinforce the core of the build. 6. Scaling Misjudgments The Problem: A model may look reasonably sized on a screen but turn out too big or too small when built. This often happens when designing without a size reference. How to Fix It: Compare your model to an existing LEGO minifigure or brick for scale reference. Use a standard LEGO brick or plate as a measuring tool during digital design. Estimate part count and weight before committing to a full build. 7. Connections That Don’t Exist in Real Life The Problem: Software allows for pixel-perfect placement, but real-world LEGO bricks have tiny imperfections. Some digital designs rely on parts sitting just right, but friction and tolerances may prevent a perfect fit. How to Fix It: Allow for slight gaps instead of forcing precise alignments. Snap parts together frequently in real life to confirm they work. Use tried-and-true LEGO building techniques rather than experimental placements. Conclusion: Test, Adjust, and Build Smarter LEGO design software is an amazing tool, but it’s not a perfect substitute for real-world building. The best approach is to combine digital design with hands-on testing to ensure your models are not only visually stunning but also structurally sound. By recognizing and addressing these common pitfalls, you can create LEGO models that transition seamlessly from screen to shelf. Optimize Your LEGO Builds Today! Want to see more expert LEGO building tips? Stay tuned for exclusive tutorials and updates on custom LEGO models!

Behind the Scenes & Process

How to start building MOCs

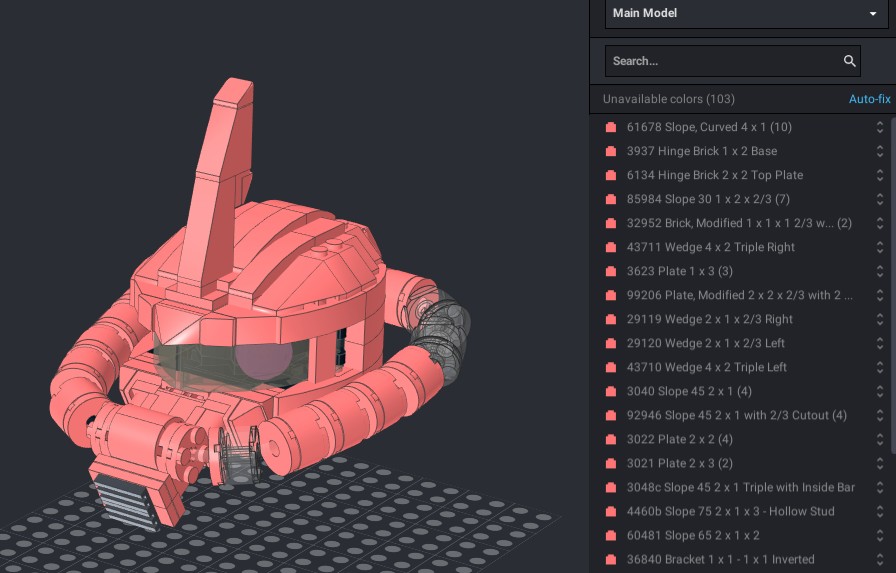
Have you ever wanted to return to the joy of building brick models but felt unsure where to begin? Have you been inspired by incredible custom creations but didn’t know how to bring your own ideas to life? Don’t worry—I’ve got you covered! Based on my personal experience, I’ll guide you through the process step by step. Every experienced MOC (My Own Creation) builder has their own techniques, but today, I’ll show you how to design stunning models using software and then turn them into real-life masterpieces for your shelves! Ready to build? Let’s get started! Getting Started with Digital LEGO Building: A Step-by-Step Guide The first step in your LEGO model-building journey is to create an account on Bricklink, the ultimate online marketplace for LEGO enthusiasts. Bricklink offers a vast selection of individual bricks, official LEGO sets, and even custom community-made models through its annual contest. Once your account is set up, navigate to the “Studio” section and download both Studio and Part Designer. Studio is the primary software where you’ll design and build your digital LEGO models. Part Designer allows you to create custom tiles with unique textures and design your own custom minifigures. After installing both programs, launch Studio and complete the built-in tutorial to get familiar with the tools. This will set you up for success in designing your dream LEGO creations! Mastering LEGO Studio: Building Smart from the Start After completing the tutorial, you might be eager to jump straight into building. While that’s a great way to familiarize yourself with the controls and learn how to find parts, I recommend taking a more strategic approach. When designing models, it’s important to consider piece availability, color options, and pricing—especially if you plan to bring your digital creations to life. Building with a plan will save you time and ensure your model is both realistic and cost-effective when ordering parts. Take your time, experiment, and refine your design before committing to a final build! Navigating the Studio Parts Catalogue: Choosing the Right LEGO Pieces The Studio parts catalogue is extensive, featuring a vast majority of LEGO molds and pieces created over the years. However, many older pieces—while visually similar to modern ones—are no longer in production and can be significantly more expensive due to rarity. To avoid confusion and unnecessary costs, I highly recommend hiding outdated parts from your selection. This will help streamline your building process and ensure you’re using readily available components. If you’re unsure about a piece, check the following:✅ Available colors – Some parts may not exist in the color you need.✅ Price – Older, rarer parts tend to be much more expensive.✅ Age of the piece – Use Bricklink’s catalogue to verify when a piece was last produced. For example, there are multiple types of 1×2 bricks that appear similar but have different bottom designs—be mindful of these variations to ensure compatibility and cost efficiency. Before You Build: One Crucial Studio Setting to Adjust Once you’ve cleaned up your digital parts selection, you might be tempted to dive right in and start building—but hold on! There’s still one important setting you need to consider before going all out. This setting can greatly impact your design process, ensuring that your model is both realistic and physically buildable when transitioning from digital to real bricks. Stay tuned as we dive into this crucial step! Avoiding Unavailable LEGO Colors in Studio As mentioned earlier, not all LEGO pieces are available in every color. Using a nonexistent color can create problems when it’s time to order your parts. To prevent this, take advantage of Studio’s built-in color filtering tools:✅ Filter by available colors – Use the checkboxes to automatically limit parts to only the colors LEGO has officially produced.✅ Identify incorrect colors – Use the tool that highlights pieces with unavailable colors.✅ Fix with one click – Recolor all incorrectly colored parts to the closest available alternative with a single button. By keeping your model’s colors realistic, you’ll avoid issues when ordering and ensure a smoother transition from digital to physical building. Preparations Complete! Ready to Start Building? That’s it for the setup—your digital workspace is now ready! 🎉 In the next post, I’ll share essential recommendations for designing your models, along with expert tips and tricks to help you create stunning and structurally sound builds. Stay tuned!

Shopping Basket
Scroll to Top