Author name: Tom Letellier

Building Techniques & Tips

How to Make Small LEGO Details Stand Out on Large Builds

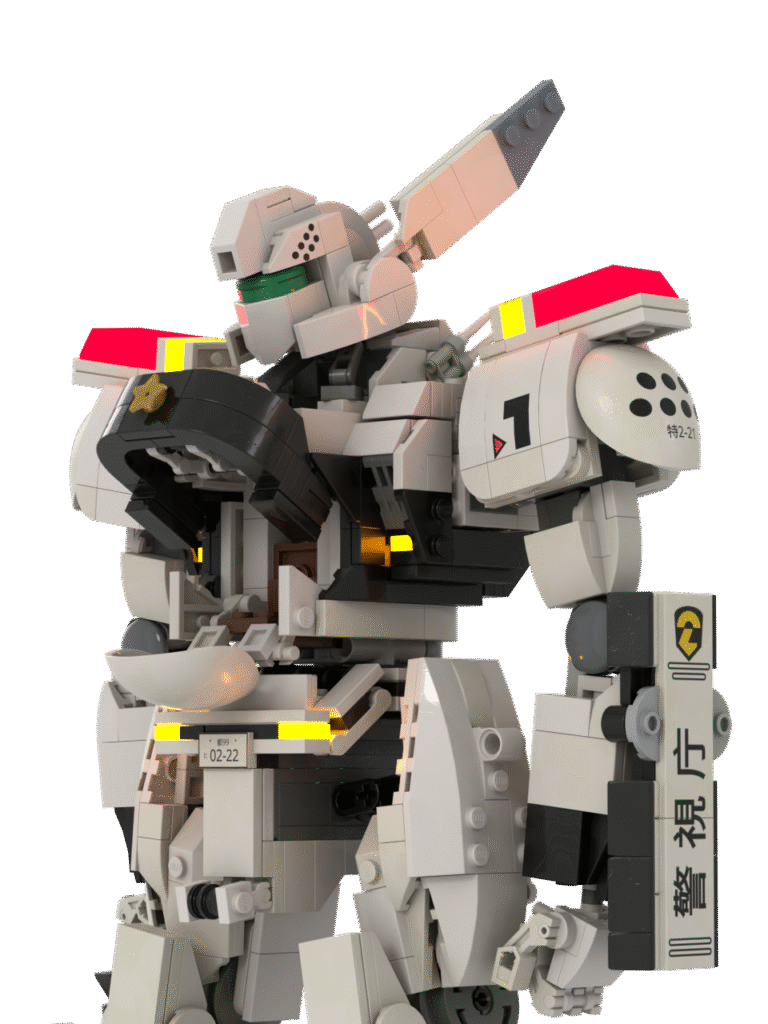
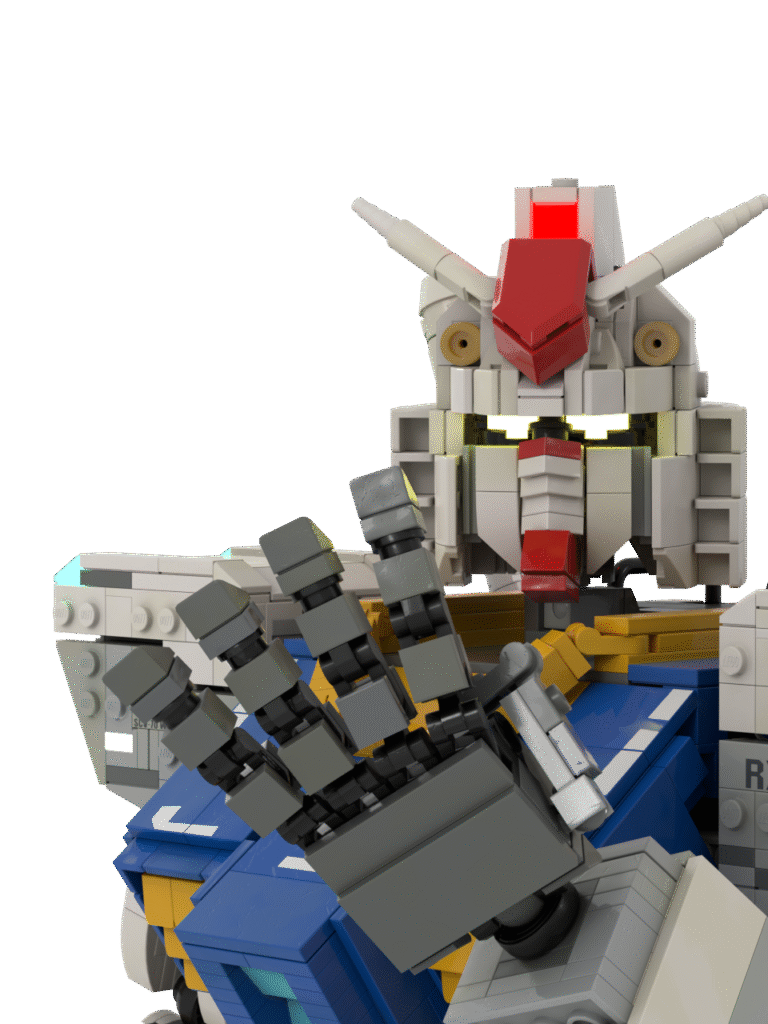
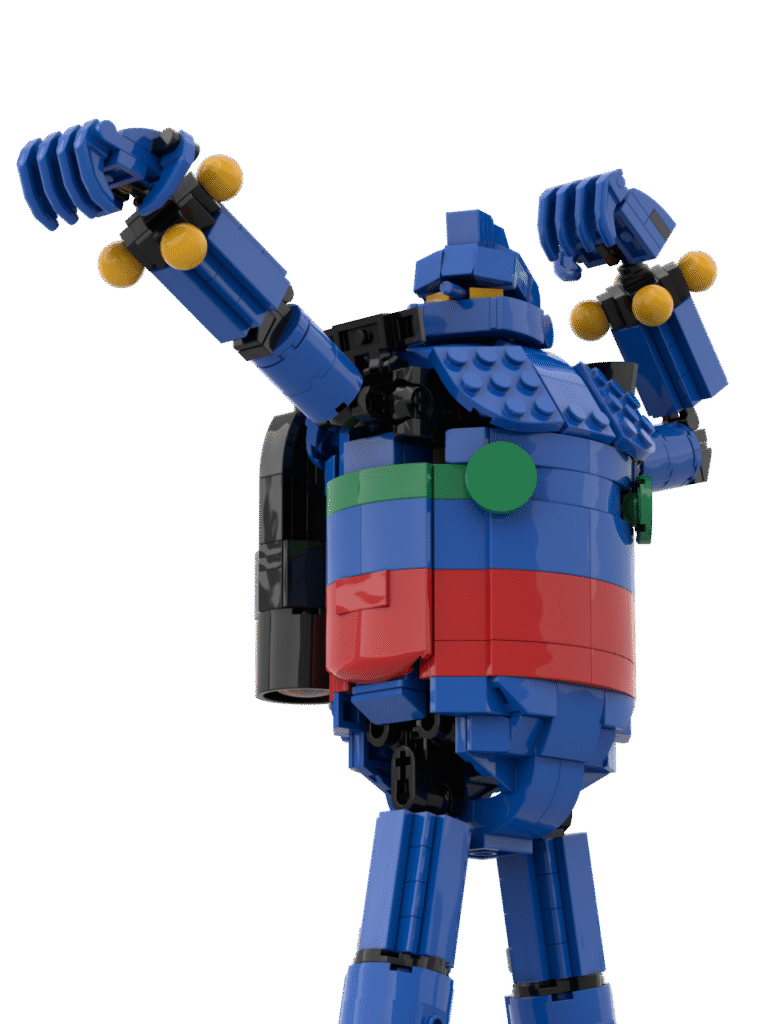
In large LEGO models, it’s easy for small details to get lost in the bigger picture. Whether you’re adding panel lines to a mech or mechanical greebles to a spaceship, these touches add realism and texture. This guide will show you how to make small LEGO details stand out on large builds using scale, color, and design principles. 1. Use Contrast Wisely Why It Works: High contrast between detail pieces and the surrounding area draws attention to them. Tips: Use light colors against dark surfaces and vice versa. Metallic or trans-clear parts can highlight tech details. 2. Create Layers with SNOT Why It Helps: Studs Not On Top (SNOT) techniques allow for angled and layered surfaces that visually pop. Techniques: Use brackets and headlight bricks to mount panels or accessories facing outward. Stack tiles and plates in varied depths for a 3D look. 3. Frame Key Features Why It Works: Framing makes details feel intentional rather than random. How To: Use tubing, bars, or slopes to create borders around small parts like vents or lights. 4. Use Repetition and Pattern Why It Works: Repeating small elements like grilles or slopes in a pattern creates a texture that reads well at larger scales. Best Use Cases: Armor plating Mech limbs Base panels 5. Guide the Viewer’s Eye Why It Matters: Visual flow directs attention to focal points. Pro Tip: Use asymmetry or angled sections to lead the eye to detailed areas. Conclusion Small details can make a big impact on large LEGO builds—if you design them to be noticed. Use contrast, layering, framing, and pattern to highlight the elements that bring your model to life. Dig Deeper For more ways to enhance your builds, read my articles on realistic mech design, color control, and advanced SNOT building methods!  

Building Techniques & Tips

Avoiding Color-Mismatch Issues in Custom LEGO Builds

There’s nothing more frustrating than completing a custom LEGO model and realizing the colors don’t match. Whether it’s slightly off shades or discolored bricks, color mismatch can ruin the aesthetic of your build. In this guide, you’ll learn how to avoid color-mismatch issues in custom LEGO builds and keep your designs visually consistent. 1. Stick to Common Colors Why It Works: LEGO has consistent color production in popular colors like black, white, red, and light bluish gray. Pro Tip: Avoid using rare or retired colors unless you have enough pieces in good condition. 2. Order New Parts When Possible Why It Matters: Used parts may vary in shade due to age or exposure to sunlight. Where to Buy: BrickLink (filter by “New”) LEGO Pick-a-Brick service 3. Use the Same Production Era Parts Why It Works: Color batches can vary slightly between years. Using parts from the same set or era helps maintain consistency. How To: Check the year and set origin on BrickLink listings 4. Sort and Compare Before Building Why It Matters: Seeing parts side-by-side lets you detect subtle color differences. Pro Tip: Use a white table or lightbox to clearly view color variations. 5. Use Color Contrast Intentionally Why It Helps: If an exact match isn’t possible, use deliberate color blocking to make variations feel purposeful. Design Tip: Separate color zones or armor panels to mask mismatches. Conclusion Avoiding color mismatch in LEGO builds is all about consistency, planning, and sourcing smartly. With a bit of prep work and smart color usage, your custom builds will look clean and professional. Next Steps Want to learn more about build quality? Check out my guides on piece sourcing, digital designing, and finishing techniques!

Building Techniques & Tips

Using LEGO Technic for Extra Strength: A Beginner’s Guide

If you’re looking to build large or complex LEGO models that need to support weight or move smoothly, LEGO Technic is your best friend. In this beginner’s guide, you’ll learn how to use LEGO Technic for extra strength, and why these elements are critical for structural integrity and motion. 1. Why Use Technic Parts? Key Advantages: Stronger connections than traditional bricks Allows rotation and motion through axles and gears Ideal for internal frames in large models 2. Essential Technic Parts to Know Liftarms/Beams: Provide core support Axles and Pins: Connect parts with strength and flexibility Frames: Offer rigid rectangular structures Bushes and Gears: Add functionality and secure moving parts 3. Building a Strong Skeleton How To Do It: Start with a Technic frame as your core Connect limbs or extensions using liftarms and axles Use friction pins to hold everything tightly together 4. Combine Technic with Standard Bricks Why It Works: Technic adds strength while standard bricks provide shape and detail. Pro Tip: Use Technic internally and skin the exterior with regular LEGO parts. 5. Common Beginner Mistakes Using too few connection points Relying only on regular bricks for support Forgetting to align axles and pins properly Conclusion LEGO Technic is a game-changer when it comes to building durable and functional models. With just a few parts and techniques, you can dramatically increase your MOC’s strength and articulation. Want More? Check out my tutorials on reinforcing mechs, Technic joints, and hybrid building techniques for stronger custom creations!  

Building Techniques & Tips

How to Reinforce LEGO Builds Without Losing Articulation

When building articulated LEGO models like mechs, characters, or animals, keeping both strength and flexibility is key. Reinforcing your build without sacrificing movement is a delicate balance. In this guide, I’ll show you how to reinforce LEGO builds without losing articulation, using smart techniques that preserve poseability. 1. Use Ratchet and Ball Joints for Load-Bearing Articulation Why It Works: Ratchet joints lock in place under pressure, while ball joints allow free movement. Best Use Cases: Hips, shoulders, knees, and elbows. Pro Tip: Pair ratchets with friction pins to help distribute weight across multiple elements. 2. Anchor Joints with Technic Frames Why It Works: Technic frames and liftarms create a secure base without restricting rotation. How to Use: Build a Technic “cage” around joints. Allow space for rotation and range of motion. 3. Double Up on Connection Points Why It Works: More contact = more strength. Technique: Use dual pins or axles on limbs to reduce stress on a single point while maintaining joint mobility. 4. Use Brackets and SNOT Strategically Why It Works: Brackets and SNOT (Studs Not On Top) allow multi-directional building, helping you wrap structure around moving parts. Pro Tip: Leave a one-stud buffer around movable areas to allow articulation. 5. Test As You Build Why It Works: You won’t know if a joint is strong until you move it! Testing Tips: Pose the model frequently while building. Add reinforcements only after confirming motion. Conclusion Reinforcing your LEGO builds while preserving articulation is totally achievable with the right approach. Combine Technic reinforcement, ratchet joints, and SNOT spacing to build models that are both tough and flexible. Learn More For more advanced tips, explore my guides on LEGO mech joints, structural stability, and digital-to-physical design workflows!  

Building Techniques & Tips

The Best LEGO Pieces for Mech Building (And Where to Find Them)

Designing a custom LEGO mech requires the right parts—pieces that are strong, flexible, and versatile enough to bring your design to life. Whether you’re building a towering battle mech or a poseable humanoid robot, having the right inventory can make or break your creation. In this guide, I’ll show you the best LEGO pieces for mech building, why they’re important, and where to find them. 1. Ball Joints and Socket Elements Why It Matters: These are essential for articulation—allowing limbs to move in multiple directions. Top Picks: LEGO Mixel joints (e.g., Part 14417) Hero Factory ball and socket pieces Where to Find: Retired sets (e.g., Bionicle, Hero Factory) BrickLink (search by part number) 2. Ratchet Joints and Click Hinges Why It Matters: These provide strong, poseable joints for weight-bearing limbs like legs or large arms. Top Picks: Part 44224 (click hinge with joint) Technic rotation joints Where to Find: Technic sets, Ninjago mechs BrickLink and LEGO Pick-a-Brick 3. Technic Liftarms, Beams, and Axles Why It Matters: They form the internal structure or “skeleton” of your mech, making it strong and modular. Top Picks: 5L and 7L liftarms (Part 32316, 32525) Axles with stops and bushes Where to Find: LEGO Technic sets BrickLink bulk lots 4. Brackets and SNOT Parts Why It Matters: These allow for unique angles and smoother armor builds. Top Picks: Bracket 1 x 2 – 2 x 2 (Part 44728) Headlight bricks (Part 4070) Where to Find: Any Creator, Modular, or custom parts sets LEGO online store and marketplaces 5. Decorative Elements for Detailing Why It Matters: Small pieces like grilles, hoses, and slopes add realism and texture to your mech. Top Picks: Grille tiles (Part 2412b) Hose flexible elements Trans-clear tiles and slopes Where to Find: Star Wars, Ninjago, and Space-themed sets Online parts stores and Brick Owl Conclusion Building a great LEGO mech starts with the right parts. From strong joints to detailed plating, these components form the backbone of any well-designed mech. Stock up from trusted platforms like BrickLink or repurpose parts from older sets to enhance your collection. Build Smarter Want more mech tips? Check out my full guide to articulation techniques, structure planning, and custom instructions!

Building Techniques & Tips

The Secret to Making Realistic LEGO Mechs and Characters

Building realistic LEGO mechs and characters isn’t just about scale—it’s about proportion, articulation, and detail. Whether you’re creating a towering robot or a stylized figure, making your build look believable and functional requires a thoughtful approach. In this article, I’ll share the key principles I use to bring realism into my LEGO creations. 1. Start with a Reference and Proportion Why It Matters: Accurate proportions are the foundation of realism. Use images or models as a reference. Pro Tip: Determine your scale (I use 1:30) and stick to it. Use minifigs or custom scale models as a measuring base. 2. Build a Skeleton First Why It Matters: A skeletal framework gives your mech structure and balance. It also helps define posture and joint range. Pro Tip: Use Technic beams and pins to rough out the limbs and torso before adding bulk. 3. Layer in Armor and Details with SNOT Why It Matters: Surface detailing adds visual interest and realism. Pro Tip: Use SNOT techniques (Studs Not On Top) to attach armor at different angles. Mix slopes, grills, and tiles for texture. 4. Focus on Joints and Articulation Why It Matters: Movement is essential for realism. Proper joint placement and strength give your characters lifelike poses. Pro Tip: Combine ball joints, ratchets, and Technic pins for flexibility and durability. 5. Add Color Contrast and Mechanical Elements Why It Matters: Mechanical greebles and color blocking bring depth and storytelling to your build. Pro Tip: Use hoses, bars, gears, and transparent tiles as functional and decorative elements. Conclusion Bringing realism to your LEGO mechs and characters comes down to structure, proportion, and details. By following these design principles, you can create LEGO models that feel alive—and maybe even ready for battle. Explore More Check out my other guides on joint construction, LEGO mech stability, and advanced building techniques to level up your skills!

Building Techniques & Tips

How to Avoid Weak Points in Large LEGO Builds

Building large LEGO models is incredibly rewarding, but it also comes with structural challenges. One of the biggest issues is weak connection points that lead to sagging, breakage, or instability. In this article, I’ll share how to identify and eliminate weak points in your large LEGO builds—especially useful for mech designs, vehicles, and display models. 1. Reinforce with Technic Structures Why It Matters: Bricks alone can’t handle heavy loads. Technic beams, liftarms, and axles add internal strength and distribute weight more evenly. Pro Tip: Build a Technic “skeleton” first, then skin it with plates and decorative bricks. 2. Avoid Single-Stud Connections Why It Matters: One stud isn’t strong enough to support large sections. Solution: Use multiple studs or wider bricks to connect critical areas. Always double up on clips, hinges, and pins. 3. Plan for Weight Distribution Why It Matters: Too much weight on one side can cause bending or collapse. Solution: Balance the model by distributing weight evenly across the base. Use counterweights if needed. 4. Use Interlocking Layers Why It Matters: Bricks that run in the same direction are weaker. Pro Tip: Use brick bonding techniques like alternating rows or SNOT (Studs Not On Top) methods to create interlocking layers. 5. Test Critical Points in Real Life Why It Matters: Digital models can hide stress points that only appear in the real world. Pro Tip: Build key joints and supports physically before committing to the full build. Conclusion Avoiding weak points is crucial for any large-scale LEGO build. By reinforcing with Technic, distributing weight properly, and testing critical sections, your creations will stand strong and last longer. Want More Building Tips? Explore my advanced guides on LEGO mech design, structure planning, and how to scale up from digital to physical builds!  

Building Techniques & Tips

Best Software for Designing Custom LEGO Models

Whether you’re a casual builder or a serious MOC (My Own Creation) designer, choosing the right software can dramatically improve your LEGO projects. In this guide, I’ll break down the best software for designing custom LEGO models, based on ease of use, features, and real-world compatibility. 1. BrickLink Studio Best For: All Skill Levels BrickLink Studio is my personal favorite and the go-to choice for many LEGO enthusiasts. Pros: Free and regularly updated Realistic rendering and physics Instruction builder and parts list integration Seamless connection to the BrickLink Marketplace Cons: Can lag with very large builds 2. LEGO Digital Designer (LDD) Best For: Beginners Although no longer officially supported, LDD is still a simple tool for quick builds. Pros: Intuitive interface Easy to learn Cons: Outdated parts library No longer officially maintained 3. Mecabricks Best For: Online Building and Rendering Mecabricks is a browser-based LEGO designer with powerful rendering features. Pros: No download required Realistic 3D rendering with Blender support Great for presentations and instructions Cons: Limited part availability for new elements Less intuitive for complex builds 4. LDraw + MLCAD Best For: Advanced Builders and Engineers A more technical and customizable option, LDraw with MLCAD offers unmatched control. Pros: Highly customizable Large community support and part updates Cons: Steep learning curve Requires multiple software tools Conclusion The best LEGO design software depends on your needs. If you’re building complex models with the intent to recreate them in real life, BrickLink Studio is hard to beat. Beginners may prefer LDD, while advanced users can explore LDraw or Mecabricks for detailed rendering. Ready to Start Designing? Check out my tutorial series on BrickLink Studio, or explore how I take LEGO designs from digital to real-world display!

Building Techniques & Tips

How to Make Sturdy LEGO Joints for Articulated Figures

When it comes to designing articulated LEGO figures, joints are everything. Whether you’re building a mech, a poseable character, or a transforming robot, strong and functional joints are key to durability and movement. In this article, we’ll dive into how to make sturdy LEGO joints that hold poses, resist wear, and bring your custom builds to life. 1. Use the Right Joint Type for the Job Why It Matters: Different joints serve different purposes. Knowing which joint to use improves both strength and range of motion. Best Options: Ball-and-socket joints for full mobility (ideal for shoulders and hips). Click hinges or ratchet joints for weight-bearing parts (perfect for knees and elbows). Friction pins with Technic liftarms for extra reinforcement. 2. Reinforce with Technic Liftarms and Beams Why It Matters: Loose joints can ruin the functionality of your build. Reinforcing them with Technic parts increases strength and keeps poses steady. How To Do It: Surround joints with liftarms to distribute pressure. Use cross axles with bushes to lock parts in place. 3. Double Up on Connection Points Why It Matters: One connection is rarely enough for heavy limbs. Doubling up adds strength and prevents wobble. Pro Tip: Connect limbs with two Technic pins or multiple axles to balance stress across more elements. 4. Plan Joint Placement for Balance and Stability Why It Matters: Improperly placed joints can cause a figure to topple or sag. Strategic placement helps maintain stability. Pro Tip: Keep the center of gravity low and align major joints (like hips and knees) directly under the torso. 5. Test in Real Life, Not Just in Software Why It Matters: Some joints might seem fine digitally but fail when physically built. Always test and adjust. Pro Tip: Try a range of poses and simulate wear by gently shaking or moving the model multiple times. Conclusion Creating strong LEGO joints is essential for any articulated figure. With the right parts, reinforcement techniques, and real-world testing, your builds will be ready to move, pose, and impress. Looking to Build Better LEGO Figures? Explore my other guides on LEGO articulation, balance, and mech design, or dive into custom instructions to build your own!  

Building Techniques & Tips

Advanced LEGO Building Techniques for Giant Robot Designs

Designing giant LEGO robots requires more than just stacking bricks—it takes engineering, creativity, and advanced techniques to create builds that are both massive and moveable. In this article, I’ll share some of the advanced LEGO building techniques I use to bring my custom mech models to life, combining aesthetics, functionality, and strength. Whether you’re building a towering mech or a battle-ready bot, these strategies will help you design more impressive, durable, and detailed LEGO creations. 1. Internal Technic Frames for Structural Support Why It Matters: Large builds can collapse under their own weight. Using Technic beams and axles as internal frames gives your robot a skeleton that can support its own mass. Pro Tip: Build the internal frame first, then attach plates and decorative bricks afterward. This provides a solid base for joints and armor plating. 2. Ball Joints, Ratchet Joints, and Custom Joint Solutions Why It Matters: Articulation is key to any good mech. Use a combination of ball joints, ratchets, and friction pins to give your robot poseability without sacrificing strength. Pro Tip: Double-joint knees and elbows for improved movement, and reinforce all rotating joints with Technic liftarms. 3. SNOT (Studs Not On Top) Techniques for Smoother Detailing Why It Matters: To make your robot look less blocky and more lifelike, use SNOT building techniques. This allows you to attach parts at unconventional angles and build smoother surfaces. Pro Tip: Use brackets, headlight bricks, and sideways tiles to layer in armor and add visual complexity. 4. Modular Design for Easier Assembly and Transport Why It Matters: Large robots can be difficult to move or repair if built as one piece. Build in modules—like legs, arms, torso—so they can be constructed separately and clicked together later. Pro Tip: Use Technic connectors or pin-and-axle combinations between modules for both secure connection and mobility. 5. Counterbalancing and Weight Distribution Why It Matters: Top-heavy mechs are prone to tipping. Distribute weight evenly and use counterweights in the feet or hips to keep the build stable. Pro Tip: Add heavier parts like battery boxes or Technic bricks to the lower half of the robot. Conclusion Mastering advanced LEGO mech-building techniques opens up a new world of creative possibilities. From reinforced joints to dynamic posing and realistic detailing, the right strategies can make your giant LEGO robots both stunning and sturdy. Ready to Build Better LEGO Robots? Check out my full series on LEGO mech design, including guides on articulation, balance, and software tools to bring your creations to life!

Shopping Basket
Scroll to Top